introduction
Using minikube
Minikube is a lightweight Kubernetes implementation that creates VMs and deploys simple clusters of just one node on your local machine.
It is recommended to use minikube standalone to experience the basic functions first., kubernetes.io ,You will still need to use minikube to compare and understand it when debugging later.
install minikube empress
1 | minicube start |
For the dashboard initialized by minikube, there is no need to deal with permissions and login, so it can be used directly. If you build a bare metal dashboard, it will be extremely complicated to configure the permissions and logins for the dashboard.

The page is mainly about adding, deleting, and checking resources of various classes, which is helpful when you are not familiar with the commands.
Prepare the docker image
Here we create an image of Aliyun for debugging.
1 | // 两个版本,用于测试更新 |
Simple node service, port 8080, http output current node ip and hostname, v2 will show v2
1 |
|
Deploying services
Create namespace for easy management and cleanup
1 | kubectl create namespace test |
If the system is easy to install kubectx , Can be installed after kubens test to switch namespace, not convenient to install the subsequent command plus -n test specify namespace for test.
Creating a yaml configuration file locally for kubectl apply -f file.yaml startup is equivalent to creating it on the command line.
appV1.yaml
1 | apiVersion: apps/v1 |
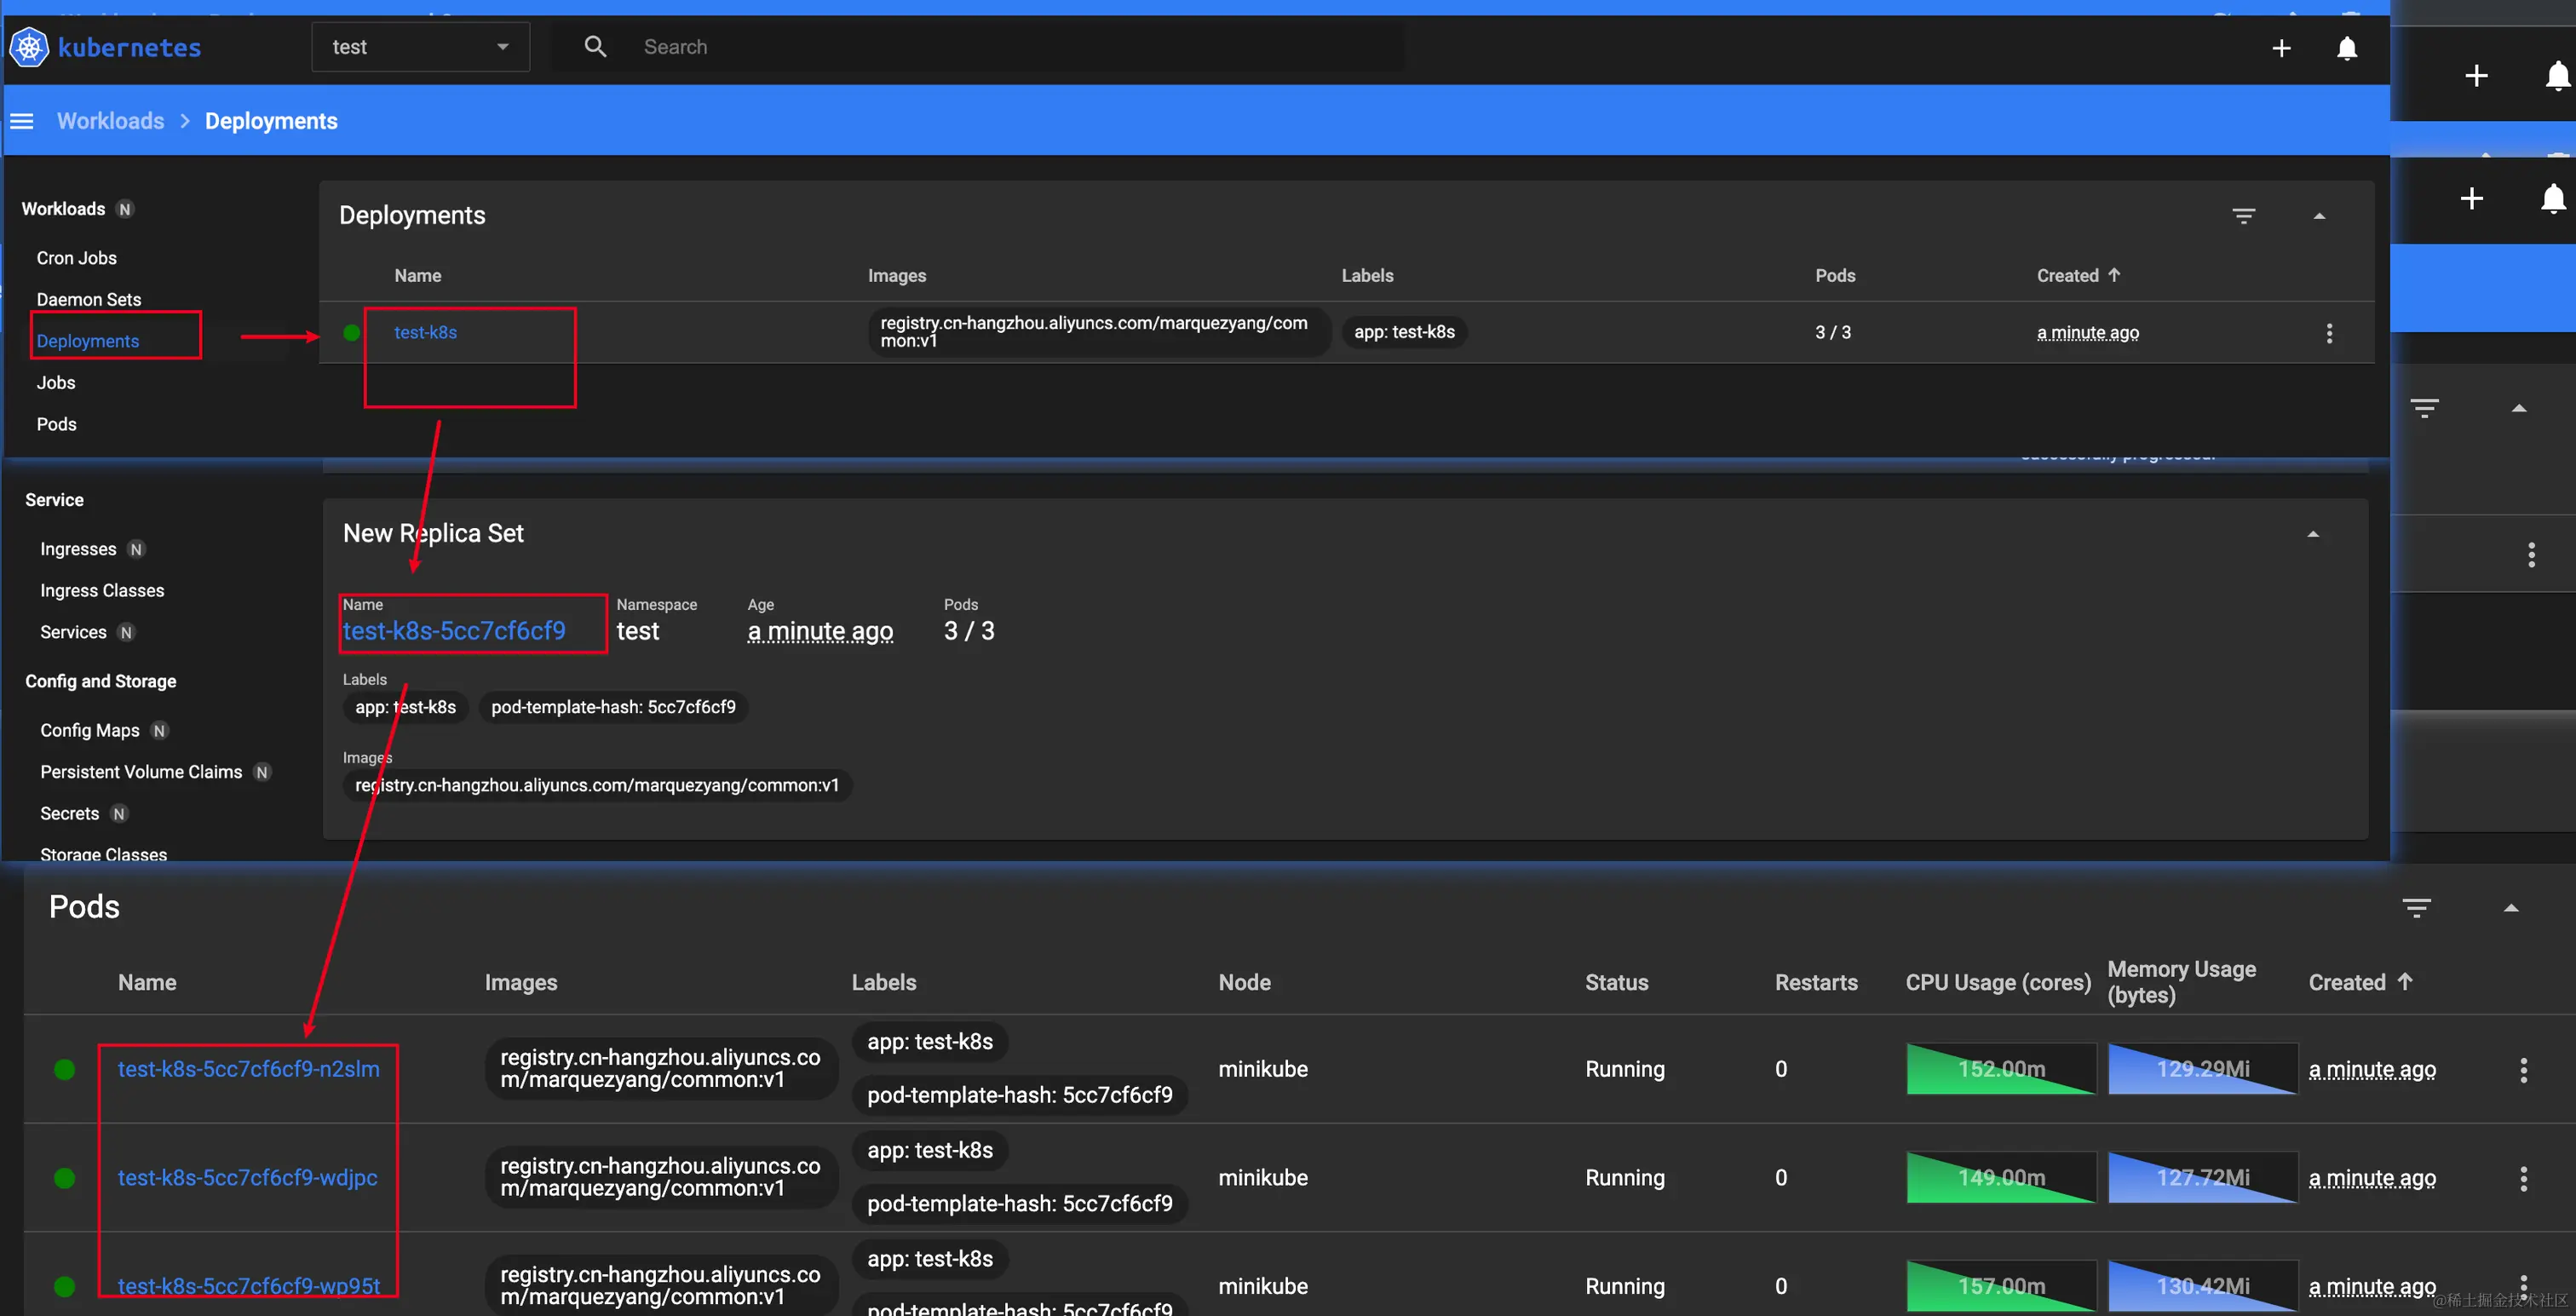
Bottom to top:
- A single
podis the smallest unit of a k8s deployment and contains one or more containers representing an application. For example, a wordpress docker deployment would have two containers, wordpress+mysql, for a single deployment. - pod has metadata, which is used to give a selector to the parent abstraction collection, which is then clustered for operation
- replicas: 3 creates a
ReplicaSetcollection, which contains the same pods. In this case, it creates 3 identical pods, contained in aReplicaSet. - At the top, create a
Deploymentthat points to the createdReplicaSet.
kubectl create
1 | kubectl apply -f ./yaml/deploy/appv1.yaml -n test |
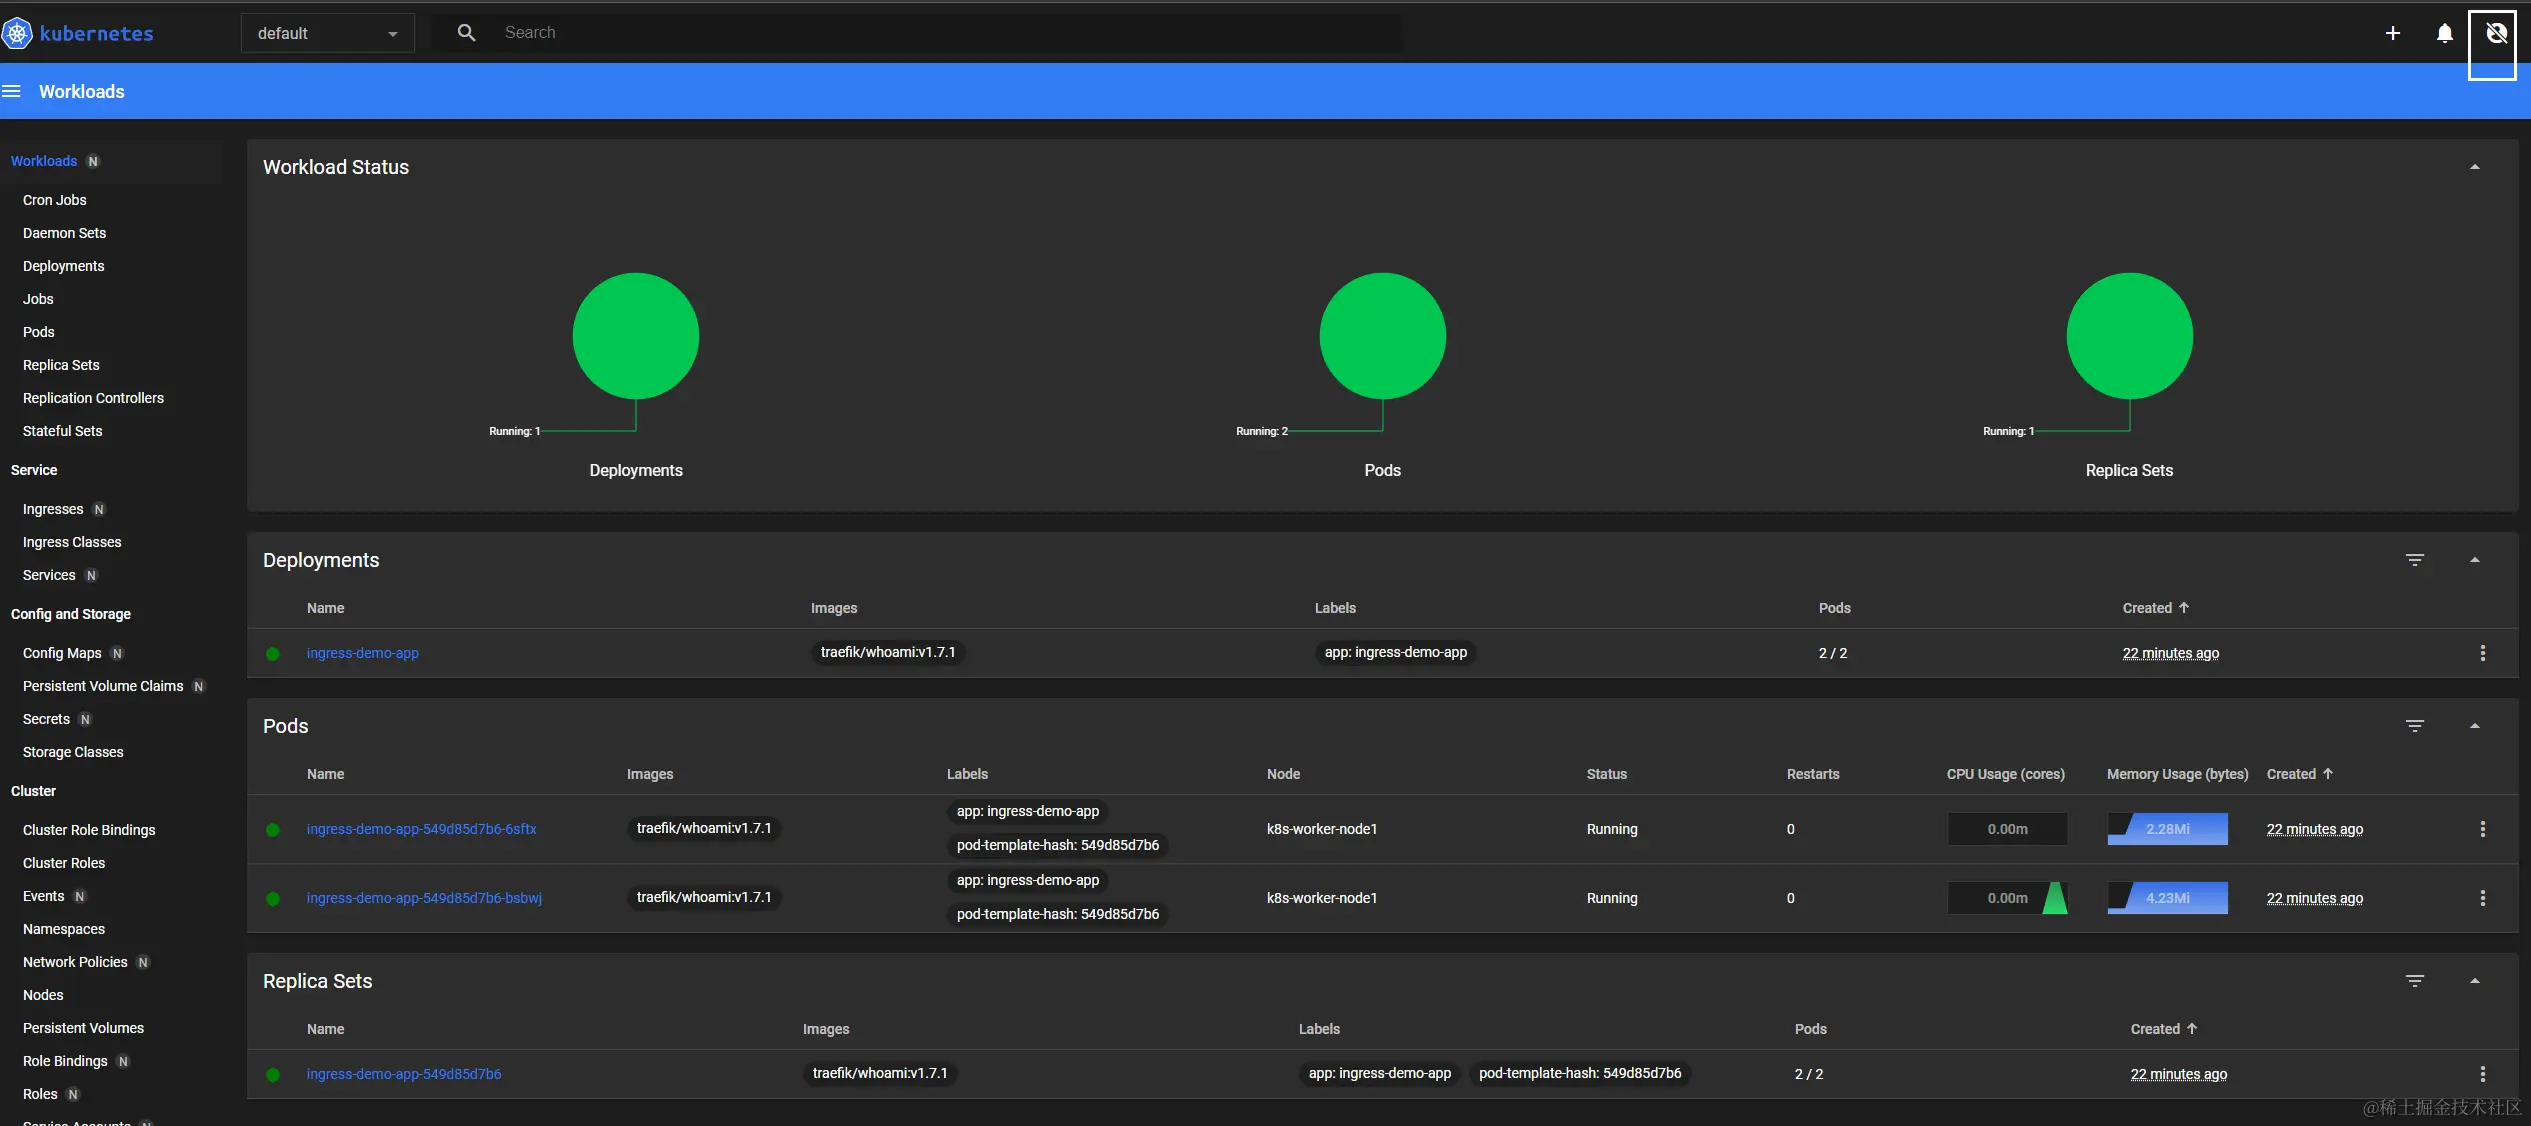
Find the single Deployment in the dashboard, click on it and scroll down to find the ReplicaSet that it points to, and click on it and scroll down to find the 3 pods that were created.
Accessing the minikube network
minikube runs in docker and is network isolated. There are two ways to access the minikube network:
- minikube ssh, into the container bash
- minikube tunnel
Here we use minikube ssh to try to access a single pod and dashboard into the details of a particular pod. 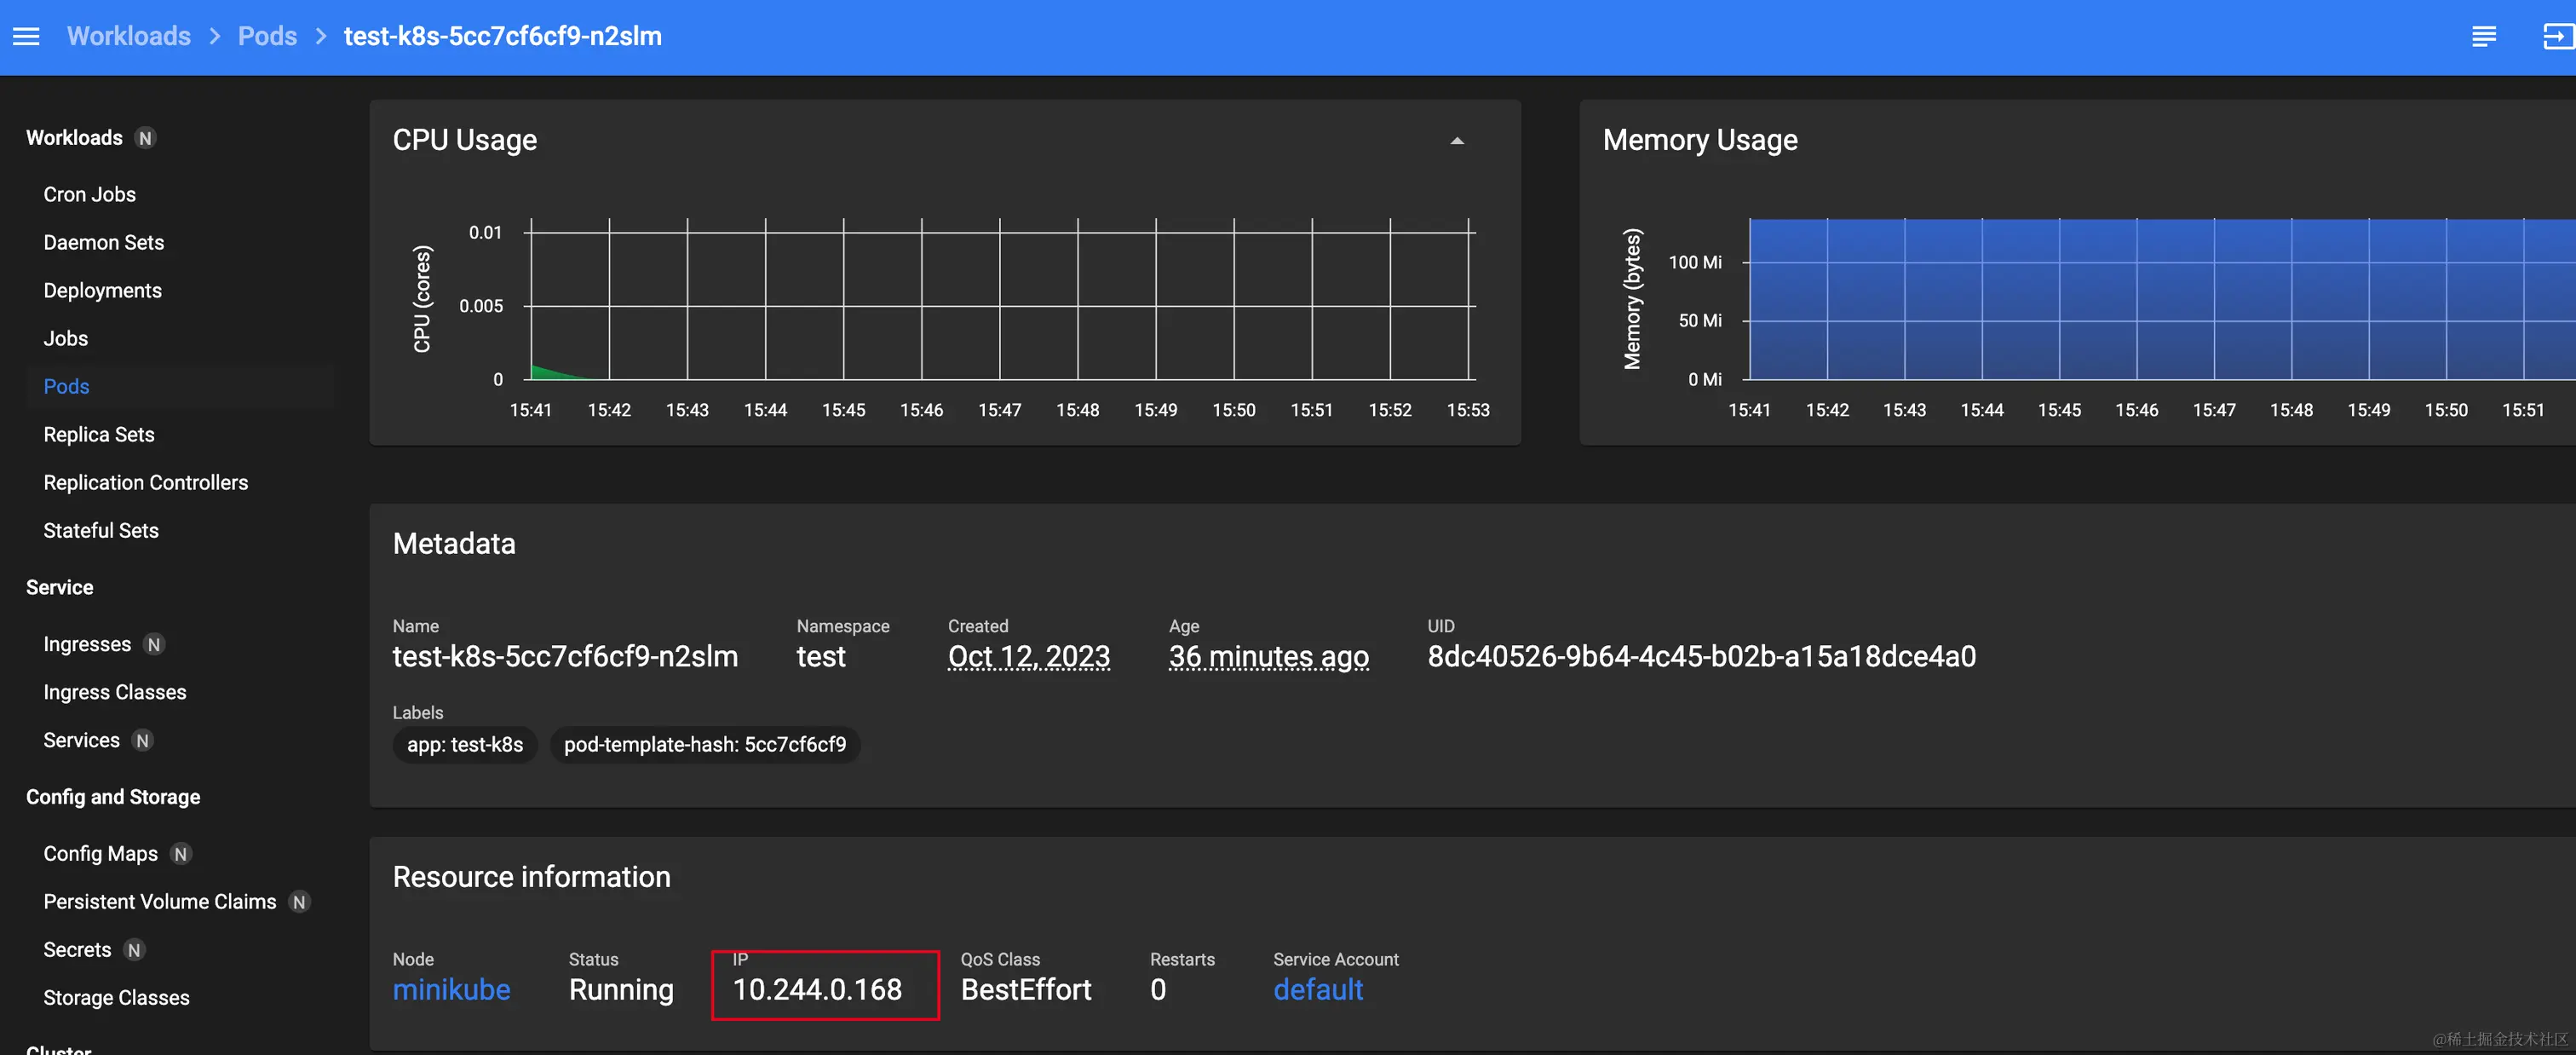
After minikube ssh into the bash curl the ip address of the pod to access the individual pods. 
Creating a Service
The Service API is an integral part of Kubernetes and is an abstraction that helps you expose collections of Pods on the network. Each Service object defines a logical collection of endpoints (typically these endpoints are Pods) and a policy for how to access those Pods.
Create service.yaml
1 | apiVersion: v1 |
1 | kubectl apply -f ./yaml/deploy/service.yaml -n test |

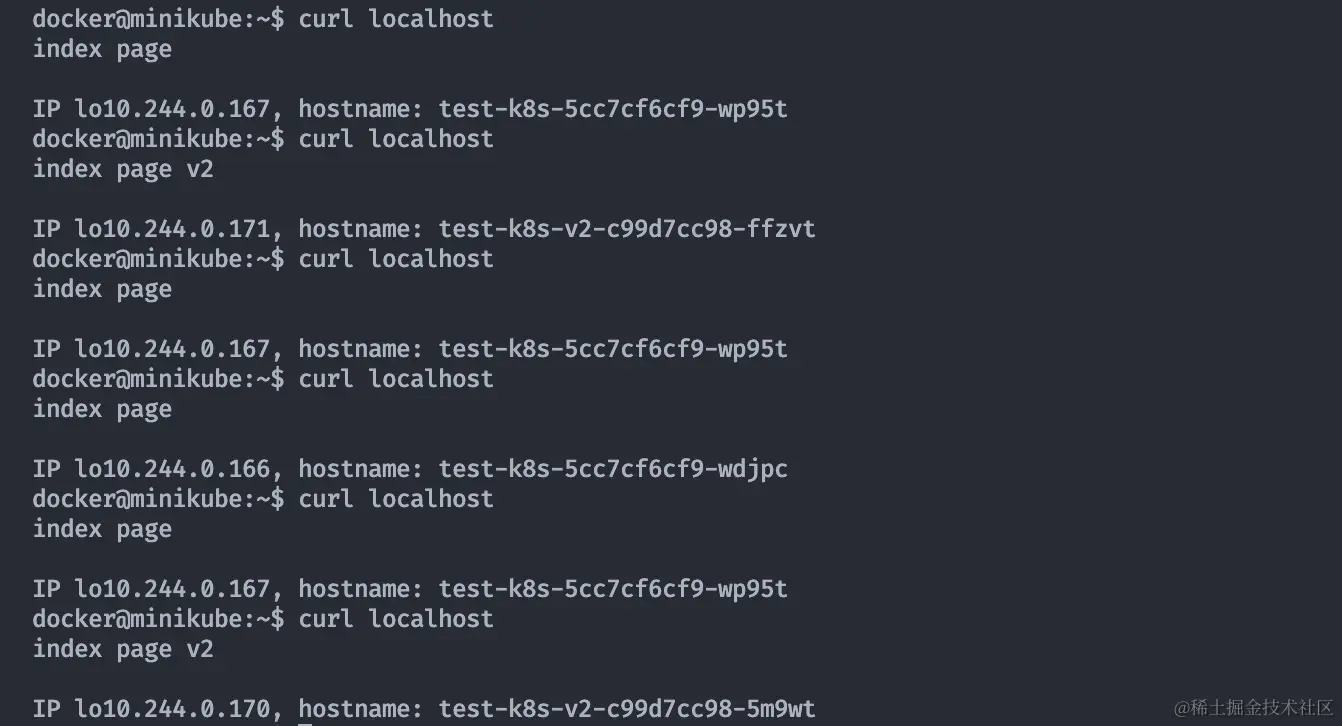
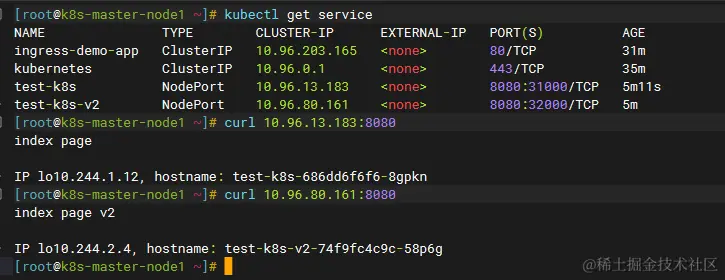
In minikube ssh, you can curl to the services exposed by servcie, and with load balancing, you can see that it is evenly distributed among the three pods 166, 167, and 168.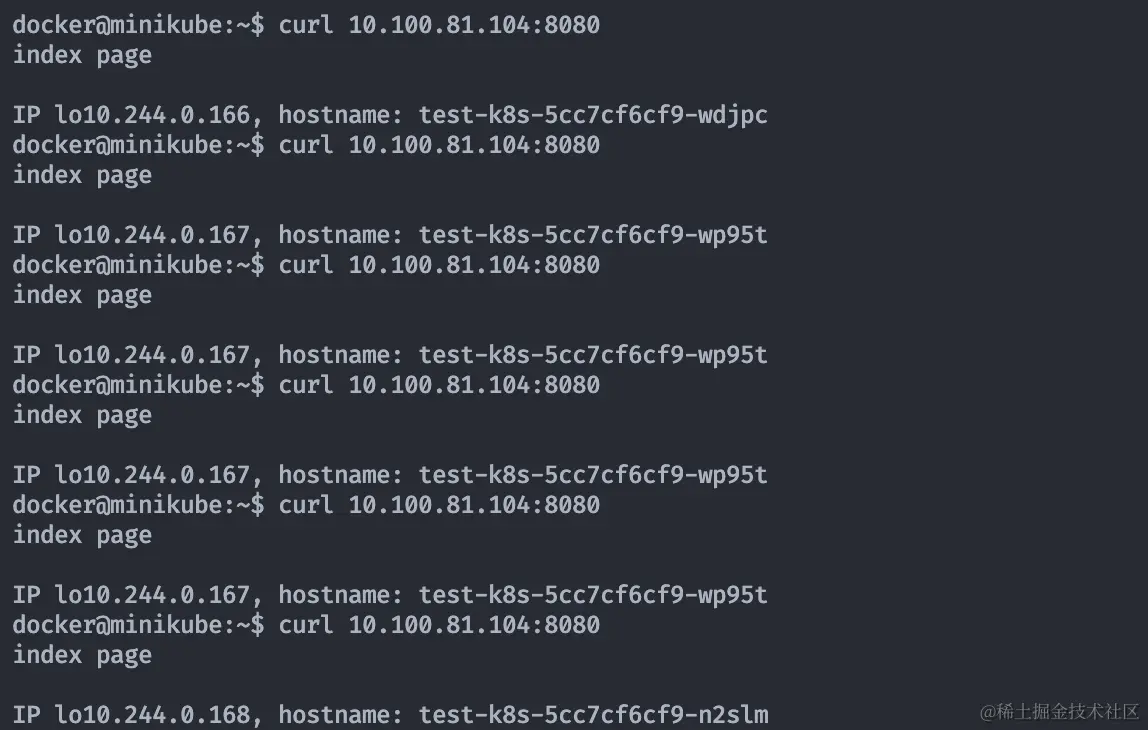
You can also use minikube service to automatically open the page and browser access experience.
1 | minikube service deploy-service -n test |
Creating an Ingress Experience Grey Release
First, create a new deployment and service that uses the v2 img, and create a single file, appServiceV2.yaml.
1 | apiVersion: apps/v1 |
1 | kubectl apply -f ./yaml/deploy/appServiceV2.yaml -n test |
At this point, there are two services, v1 and v2. 
Test the v2 service
1 | minikube service test-k8s-v2 -n test |
In local experience, if you refresh the tab a few more times in your browser, you can see that it is hitting different IPs (pods) evenly, and the page shows v2.
At this point, there are already two stable url load balancing to their respective pods. If you want to have a canary effect, where half of the page traffic is v1 and half is v2, you can do it with a local nginx. But k8s already provides a wrapper for this, called Ingress.
Ingress is an API object that manages external access to services in the cluster, typically through HTTP. Ingress can provide load balancing, SSL termination, and name-based virtual hosting.
first install ingress
1 | minikube addons enable ingress |
creater ingress1.yaml
1 | apiVersion: networking.k8s.io/v1 |
ingress2.yaml
1 | apiVersion: networking.k8s.io/v1 |
1 | kubectl apply -f ./yaml/deploy/ingress1.yaml -n test |

At this point, ADDRESS is minikube ip value 192.168.58.2 (docker’s intranet address, not reachable locally), which means it has been successful. And ingress is 80, port 443 by default. After minikube ssh into bash, curl localhost (80) several times.
It can be seen that it hits v1,v2 evenly, and it also hits each IP (pod) evenly. We have achieved the expected gray-scale release effect, and the production environment gray-scale release effect is also basically reproduced. (Here you can also minikube tunnel after the browser to visit localhost experience, pay attention to lift the local 80 port occupation.)
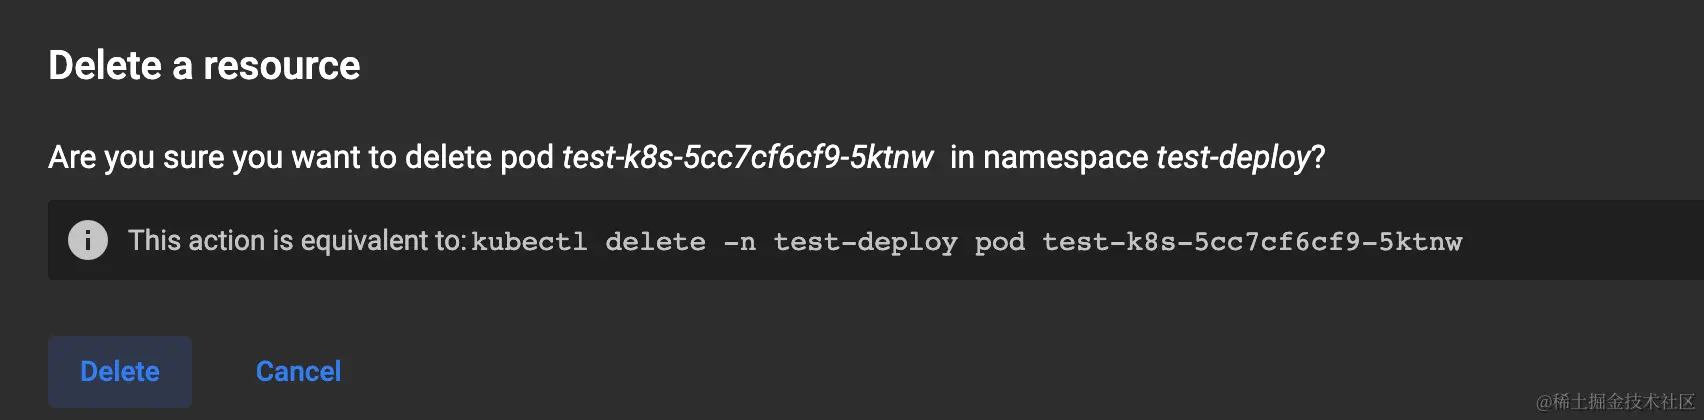
Finally clean up the site kubectl delete namespace test can be. If you haven’t created a namespace before, it’s not as convenient to clean it up. The performance of k8s is actually quite high, and my private cloud VM can’t handle it at all, so I can shut it down in time.
Bare metal setup
Creating a Virtual Machine
I used the ESXi VM system from my private cloud and created three CentOS 7 VMs with at least 2c4g each. You can install them locally or consider renting a cluster from a cloud provider.

Creating a Cluster
Generally for the sake of understanding, multi-node bare-metal clusters are recommended to be built manually for the first time. But actually still use kubeadm init, is still mechanized copy command, in this network and system configuration is stuck in no sense, recommended to use a key script to build:
Go to the 192.168.31.153 terminal and execute the
1 | export MASTER_NODES="192.168.31.153" |
Kubernetes executes your [workloads] by placing containers in Pods running on nodes (Nodes) . A node can be a virtual machine or a physical machine, depending on the cluster configuration in which it resides. Each node contains a virtual machine running Pod; these nodes are controlled by [control plane](https://link.juejin.cn?target=https%3A%2F%2Fkubernetes.io%2Fzh -cn%2Fdocs%2Freference%2Fglossary%2F%3Fall%3Dtrue%23term-control-plane “https://kubernetes.io/zh-cn/docs/reference/glossary/?all= true#term-control-plane”) is responsible for management.
Above, we used minikube as a single node in the local docker. In fact, the definition of a node is consistent with common network terminology and can refer to a single machine. If there are two work nodes in the cluster and a deployment wants to create four pods, those four pods will be deployed evenly across the two nodes (machines).
When you’re done building, check out the
1 | kubectl get nodes |

The intranet IP is
1 | 192.168.31.153 k8s-master-node1 |
Using dashboard
The script already has dashboard installed, but rbac is a bit tricky to configure.
1 |
|
I found that it requires a login and is restricted to https or localhost only. Here’s how to get around it.
Installation of the dashboard is usually done using a remote yaml such as
1 | kubectl apply -f https://raw.githubusercontent.com/kubernetes/dashboard/v2.7.0/aio/deploy/recommended.yaml |
Download this locally, e.g. dashboard.yaml, search for ‘args’, there is only one place, add two lines
1 | containers: |
At this point, the login page can be skipped, but there are no data permissions once inside. You need to refer to this issue [[github.com/kubernetes/…](https:// github.com/kubernetes/dashboard/issues/4179#issuecomment-610078007)].
Create admin.yaml , copy the configuration in the comment above, kubectl apply -f , and then the unlogged dashboard is available.
Deploying services
Reuse the yaml from the minikube example above to create the two deployments and services Note that at this point, the performance of the appliance is likely to be far less than that of the previous standalone appliance, so you can set the number of pods to be smaller.
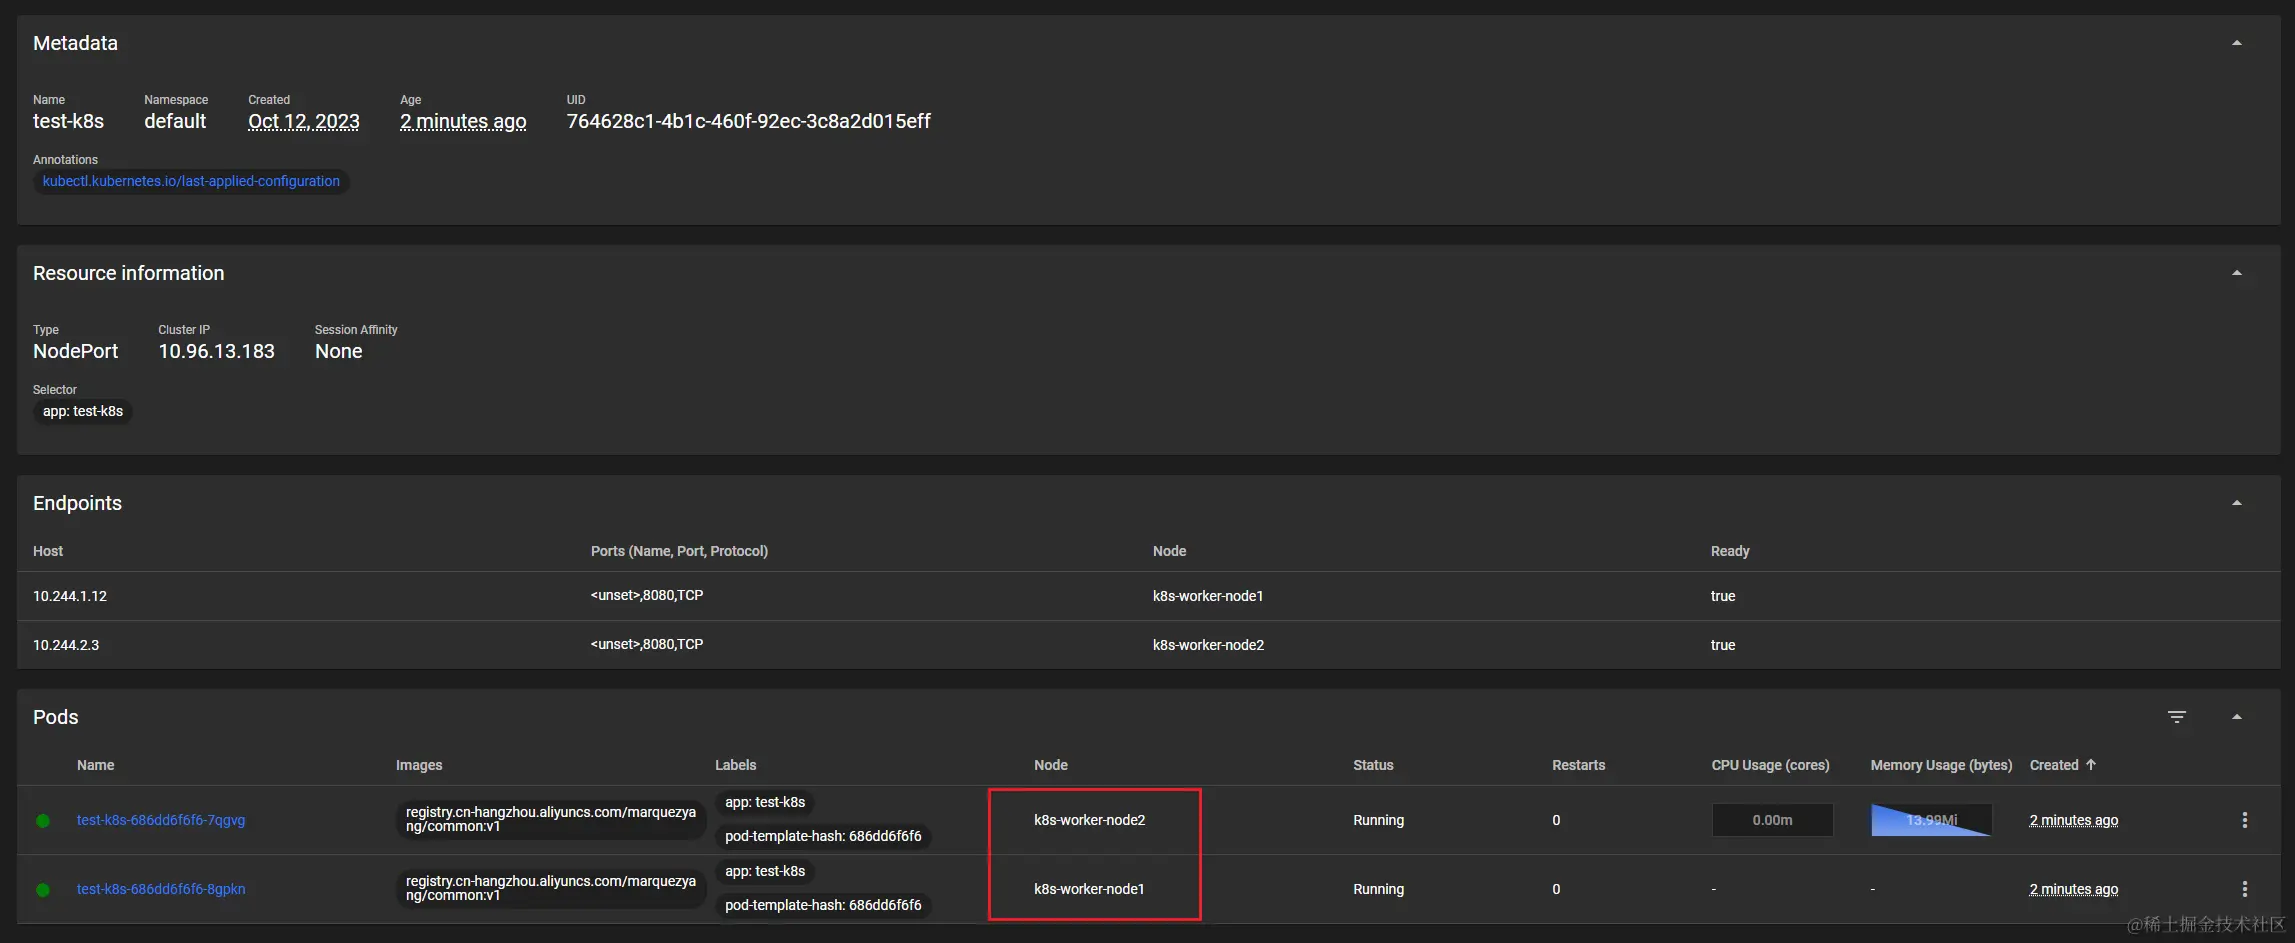
As you can see, the pods pointed to by a single Service are on node1 , node2 , i.e. two different machines. The 153 terminal can directly connect to both service ip
Deploying Ingress
Reusing the same yaml as above, create a grayed-out Ingress, knowing that nginx is on node 192.168.31.151.

But at this point, curl 192.168.31.151 can’t connect, type in
1 | kubectl get service -n ingress-nginx |

ingress-nginx doesn’t have an external-ip, so I tested with Cluster-ip. Multiple curl 10.96.103.254
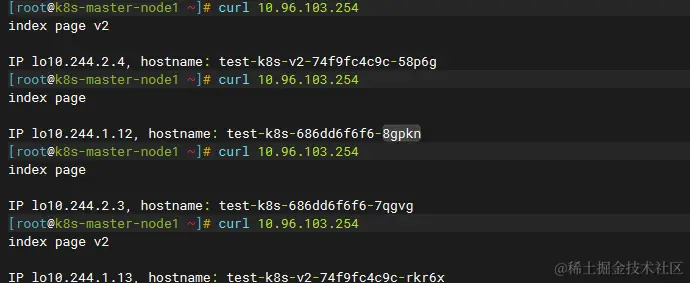
**It can be seen that the hits are evenly distributed to v1 ,v2 and also to each IP (pod) **. And at this point, the pods are actually distributed across two virtual machines, as expected.
At this point Nginx on node1, you can test the node2 shutdown, at the same time in the master continue to curl , you can find that you can still access the deployment of node1 pod, that is, disaster recovery high availability. Turn node2 on again and the cluster is restored.
Summary
We have yet to build more complex scenarios such as data persistence and deployment of stateful applications. However, after the above, we already know the concepts of pod , deployment, service, ingress, and node in k8s very well, and we also successfully built a cluster and experienced the gray-scale release function, so it can be said that we have completely unlocked the skill tree of k8s. In the future, the articles recommended by the system will become its nutrients, and continue to grow, and eventually grow into a big tree.
Writing the article itself is also a learning process, and I would like to ask the readers to point out any mistakes or omissions in the article. If this article is helpful to you, welcome to like the collection.